Configuring and managing your server
How to Add a Minecraft Server Icon

Minecraft servers can be customized in many ways to make them unique and stand out. One of the ways you can do this is by changing the server icon that appears in the multiplayer server list in-game. The icon will help your server be more recognizable and make it more attractive to players. In this tutorial, we will go through the steps of how to change the server icon on a Minecraft server.
Prepare Your Icon
The first step is to make sure that the server icon is in the proper format and size. The icon must follow three simple rules to be used on a Minecraft server:
- The icon must be 64x64 pixels in size
- The icon must be named server-icon.png
- The icon must be in .PNG format
You can use an image editing tool to resize and format your image to meet these requirements. If your image is not already 64x64 pixels, you can use a simple image resizer tool to resize it.
How to check the Icon size ?
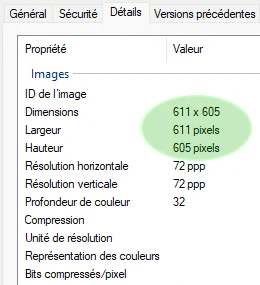
To check the size of an image on a Windows computer, you can follow these steps:
- Right-click on the image file you want to check the size of.
- Select "Properties" from the drop-down menu.
- In the Properties window, click on the "Details" tab.
- Scroll down to the "Image" section, where you will see the dimensions of the image listed as "Width" and "Height".

On a Mac, you can check the size of an image by following these steps:
- Right-click on the image file you want to check the size of.
- Select "Get Info" from the drop-down menu.
- In the Info window, you will see the dimensions of the image listed under "More Info".
How to resize the Icon ?
To resize an image to 64x64 pixels, you can use an image editing tool or an online image resizer. Here are the steps to use an online image resizer:
- Go to an online image resizer website like https://www.simpleimageresizer.com/.
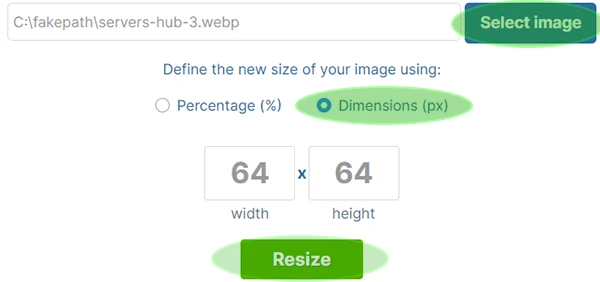
- Click on the "Select Image" button and choose the server icon you want to resize.
- Once the image is uploaded, select "Dimensions" instead of "Percentage" and enter "64" for the width and height.

- Click on the "Resize" button.
- After a few seconds, a green box with a download button will appear. Click on the "Download" button to save the resized image to your computer.

- Rename the icon to server-icon.png if it's not already the case.
Alternatively, you can use an image editing tool like Paint or Photoshop to resize the image to 64x64 pixels. Here's how to do it in Paint:
- Open the server icon in Paint.
- Click on the "Resize" button in the toolbar at the top of the window.
- Select the "Pixels" option and enter "64" for both the width and height.
- Make sure the "Maintain aspect ratio" option is checked, so that the image is scaled proportionally.
- Click on the "OK" button to resize the image.
- Save the resized image as a PNG file with the name "server-icon.png".
Uploading the Icon
Upload to Your Server Once you have prepared your icon, the next step is to upload it to your server. Here are the steps to do so:
- Log in to your control panel and stop your server.
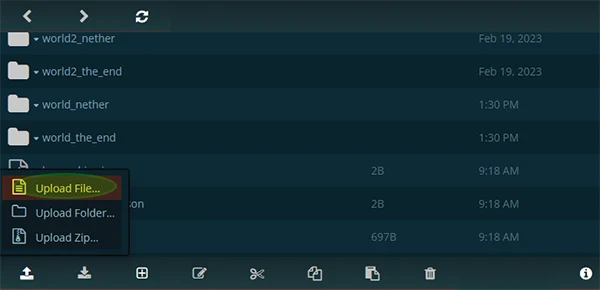
Click on WebFTP on the top of your panel

- Click on the Upload Arrow on the bottom of window to select, or Drag and Drop your server-icon.png file.

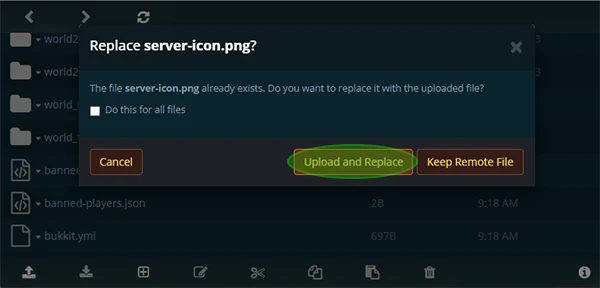
- Confirm to replace to current server-icon.png file.

- Once the upload is complete, start your server.
If you have met all the criteria and have uploaded the file correctly, the server icon should now be visible in the multiplayer server list in-game.

Common Issues
If you are not seeing the new server icon in the server list, here are a few things you can check:
- Make sure you have restarted the server after uploading the new icon.
- Double-check that the file is named server-icon.png and is in the proper .PNG format.
- Check the size of the file and make sure it is 64x64 pixels.
By following these steps, you can successfully change the server icon on your Minecraft server. A custom server icon can help your server stand out and attract more players to your community.
