Xaero's Minimap Mod is a popular mod for Minecraft that adds a minimap to the game.
It is available on all Minecraft versions and works for both single-player and multiplayer games.
This tutorial covers how to install, configure, and use Xaero's Minimap Mod.
Installing Xaero's Minimap Mod on client
Before you start, make sure Minecraft is installed on your computer.
- Download the mod from the official Xaero's Minimap website or CurseForge.
- Install Minecraft Forge if you haven't already.
- Find your Minecraft directory:
%appdata%\.minecraft on Windows, ~/Library/Application Support/minecraft on Mac.
- Open the mods folder. Create it if it doesn't exist.
- Move the downloaded
.jar file into the mods folder.
- Launch Minecraft and verify the mod appears in the mods list from the main menu.
Installation on server
- Open the WebFTP from your panel.
- Drag and drop the
.jar file into the mods folder.
- Restart your server, then launch Minecraft.
Xaero's Minimap Controls
The minimap is controlled by a few simple keyboard shortcuts:
W
Opens a larger version of the minimap to see greater distances.
Y
Opens the mod settings (radar, size, shape, and more).
B
Quickly opens the Waypoint creation screen.
U
Opens the Waypoints menu: list, teleport, or delete waypoints.
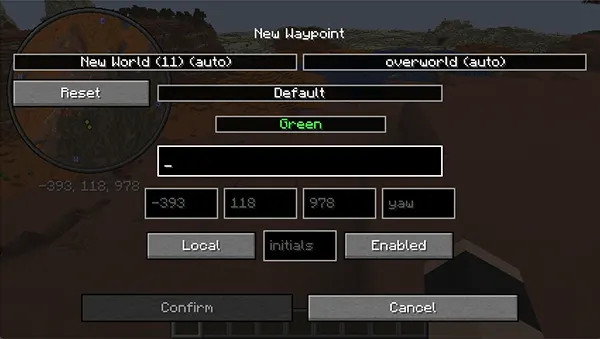
Creating Waypoints
Waypoints are markers that help you navigate through Minecraft.
Press B to create one: set the color, name, and coordinates (pre-filled or custom). You can even change the dimension.
Once saved, the waypoint appears on the minimap and in the game world. Press + to instantly create one at your current position. Use U to edit or delete existing waypoints.
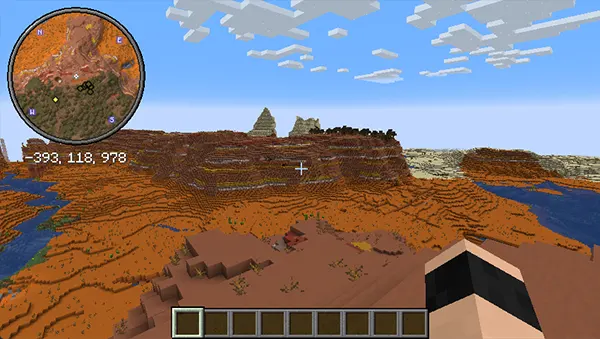
Minimap Shape and Position
Open settings with Y, then use the Position button to drag the minimap anywhere on screen.
Under View Settings, switch the shape between Square and Circle.
Entity Radar
The Entity Radar shows the location of mobs and players directly on the minimap.
By default: mobs appear as yellow dots, the player as a white circle, and ground drops as red circles.
To show icons instead of dots, go to Y → Entity Radar Settings → set Display Icons to Always. You can also enable nameplates.
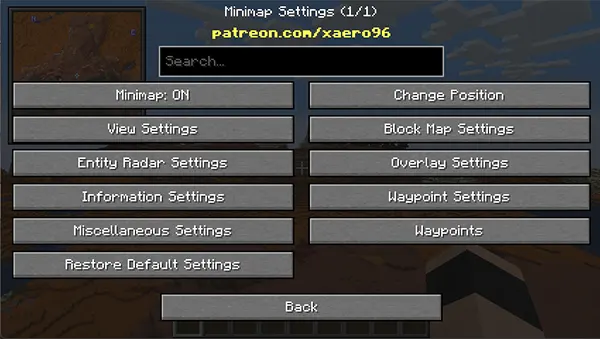
Configuring Xaero's Minimap
Press Y to open the mod menu, organized into several configuration tabs.
View Settings
Controls the overall appearance of the minimap: shape, size, corner position, and opacity.
Toggle individual elements on or off: player arrow, border, grid, waypoints, and mob icons.
When the minimap is enlarged, extra options appear for background color, border, and scale.
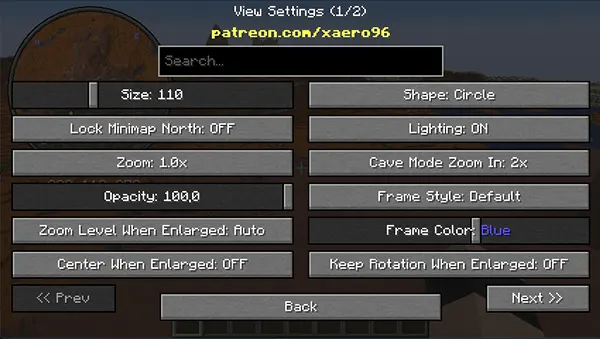
Size
Adjusts the size of the minimap on screen.
Lock Minimap North
Keeps north fixed at the top of the minimap.
Zoom
Adjusts the zoom level of the minimap.
Opacity
Controls the transparency of the minimap.
Zoom Level When Enlarged
Zoom level used in enlarged mode.
Center When Enlarged
Centers the minimap when enlarged.
Shape
Switch between square and circular minimap.
Lighting
Toggles lighting effects on the minimap.
Cave Mode Zoom In
Automatically zooms in when entering cave mode.
Frame Style
Changes the style of the frame border.
Frame Color
Changes the color of the frame border.
Keep Rotation When Enlarged
Preserves the rotation in enlarged mode.
Toggled Enlarged Minimap
Enables or disables the enlarged minimap mode.
Hide When Under F3
Hides the minimap while the F3 debug screen is open.
Potion Effects Push Box
Adjusts the position of the potion effects overlay.
Hide When Under Screen
Hides the minimap when a GUI or inventory is open.
Boss Health Push Box
Adjusts the position of the boss health bar overlay.
Entity Radar Settings
Access via Y → Entity Radar Settings to control how mobs and players appear on the radar.
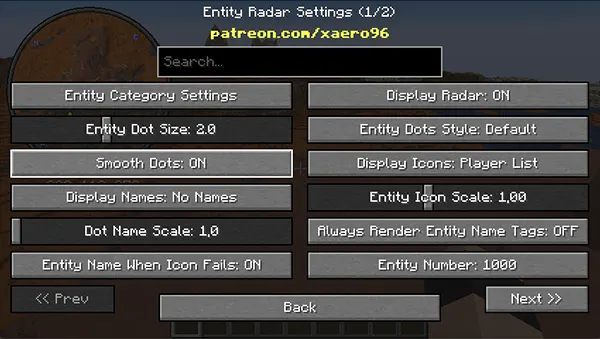
Entity category settings
Filter radar by type: all, animals, monsters, or players only.
Entity dot size
Controls the size of entity dots on the radar.
Smooth dots
Smooths the edges of entity dots for a cleaner look.
Display Names
Shows or hides entity names on the radar.
Dot Name Scale
Adjusts the text size for entity names.
Entity Name When Icon Fails
Shows the entity name when its icon fails to load.
Display Radar
Turns the entire radar display on or off.
Entity Dots Styles
Choose from various dot styles to represent entities.
Display Icons
Replaces dots with icons for entity representation.
Entity Icon Scale
Adjusts the size of entity icons.
Always Render Entity Name Tags
Always displays name tags, even for off-screen entities.
Entity Number
Limits how many entities are shown on the radar.
Entity Height Limit
Sets the maximum height for entities displayed on the radar.
Min Y Distance For Depth Fade
Controls how quickly distant entities fade out.
Main Entity As
Choose which entity to highlight as the main one.
Arrow Scale
Adjusts the size of directional arrows.
Arrow Opacity
Controls transparency of directional arrows.
Display Party/Ally Players
Shows or hides party and ally players on the radar.
Show Entity Depth
Displays the depth of entities on the radar.
Display Entity Y Level
Shows or hides the Y level of entities.
Main Entity Dot Size
Controls the dot size for the main entity.
Arrow Color
Sets the color of directional arrows.
Render Radar Over Frame
Renders the radar on top of the Minecraft game frame.
Block Map Settings
The Block Map gives a top-down view of explored terrain, useful for planning builds or locating biomes.
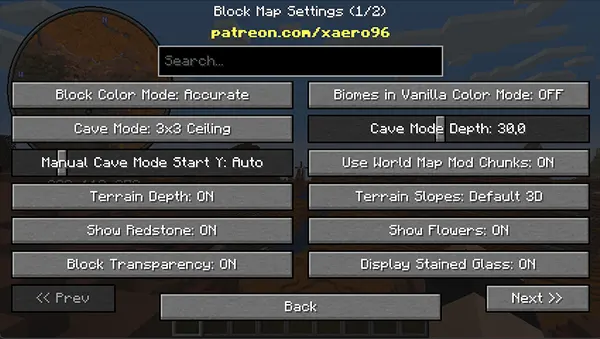
Block Color Mode
Accurate: each block shown in its true color. Vanilla: simplified palette (green/brown, water in blue).
Cave Mode Ceiling
Shows the ceiling area around the player: 1×1, 3×3, or 5×5. Can be disabled.
Manual Cave Mode Start Y Auto
Auto-detects the cave mode start Y-level based on player position.
Terrain Depth
Displays terrain depth below the player's position.
Show Redstone
Highlights the location of redstone blocks on the map.
Block Transparency
Makes blocks partially transparent so you can see through them.
Biomes in Vanilla Color Mode
Displays biomes using the vanilla color palette.
Cave Mode Depth
Sets how far down caves are displayed.
Use World Map Mod Chunks
Uses world map mod chunks instead of in-game terrain data.
Terrain Slopes
Three options: Default 3D, Flat, or Overhead.
Show Flowers
Displays flowers and plants on the map.
Display Stained Glass
Shows stained glass blocks in their actual color.
Adjust Y for Short Block
Raises the Y coordinate slightly for slabs and stairs to avoid obstructing the view.
Ignore Server Heightmaps
Uses its own calculations instead of server heightmap data. May improve performance but can reduce accuracy.
Anti-Aliasing
Smooths block edges on the map for a cleaner look. Slight performance cost.
Overlay Settings
Overlay settings add extra information layers on top of the minimap.
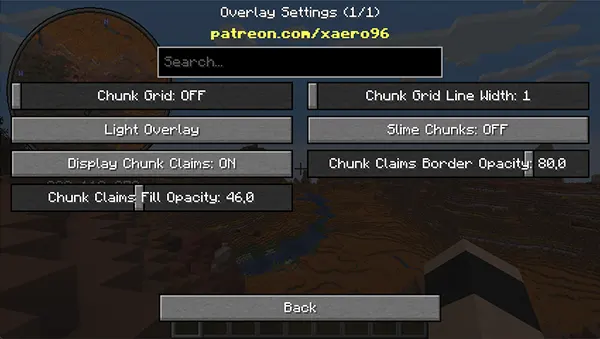
Chunk Grid
Displays a grid showing chunk boundaries on the minimap.
Light Overlay
Highlights low-light areas where hostile mobs can spawn.
Display Chunk Claims
Shows claimed chunk borders — useful on multiplayer servers.
Chunk Claims Fill Opacity
Adjusts the transparency of the claimed chunk color fill.
Chunk Grid Line Width
Sets the thickness of chunk grid lines.
Slime Chunks
Highlights slime chunks so you can find the best farming spots.
Chunk Claims Border Opacity
Adjusts the transparency of claimed chunk borders.
Waypoint Settings
Waypoints are customizable markers (name, icon, color) placed on the map for navigation and reference.
Advanced features include death points, global temporary waypoints, and cross-dimensional teleportation.
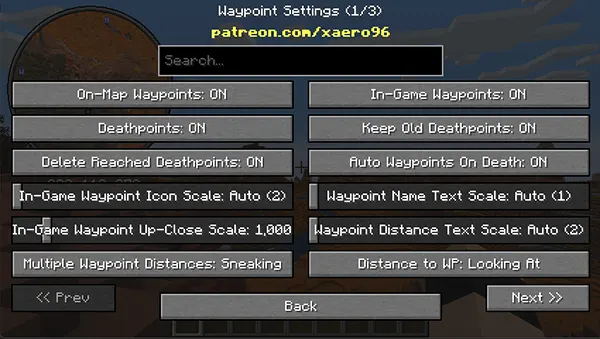
On-Map Waypoints
Toggles waypoint display on the map.
Deathpoints
Shows or hides death locations on the map.
Delete Reached Deathpoints
Auto-deletes deathpoints once you reach them.
In-Game Waypoint Icon Scale
Sets the size of in-game waypoint icons.
In-Game Waypoint Up-Close Scale
Adjusts icon size when viewed up close.
Multiple Waypoint Distances
Controls how distances to multiple waypoints are shown.
In-Game Waypoints
Toggles waypoint display inside the game world.
Keep Old Deathpoints
Keeps deathpoints on the map even after reaching them.
Auto Waypoints On Death
Automatically creates a waypoint at your death location.
Waypoint Name Text Scale
Adjusts the size of waypoint name text.
Waypoint Distance Text Scale
Adjusts the size of waypoint distance text.
Distance to WP
Controls how waypoint distances are displayed.
WP Name Above Distance
Places the waypoint name above the distance label.
Render All Waypoint Sets
Displays all waypoint sets simultaneously.
Max WP Render Distance
Maximum distance at which waypoints are shown.
Min WP Render Distance
Minimum distance at which waypoints are shown.
Waypoint Opacity in Game
Transparency of in-game waypoint icons.
Waypoint Opacity on Map
Transparency of waypoint icons on the map.
Always Display Distance to WP
Always shows the distance to the nearest waypoint.
WP Distance Vertical Angle
Vertical angle for displaying waypoint distances.
WP Distance Horizontal Angle
Horizontal angle for displaying waypoint distances.
Convert Distance to KM at
Sets the threshold at which distances switch to kilometers.
Waypoint Distance Precision
Number of decimal places for waypoint distances.
On-Map Waypoint Scale
Sets the size of waypoint icons on the map.
Global Temporary Waypoints
Creates temporary waypoints that persist across worlds.
Cross-Dimensional TP
Allows teleportation to waypoints in other dimensions.
New Waypoints to Bottom
Adds new waypoints at the bottom of the list.
Hide Waypoint Coordinates
Hides coordinates from the waypoint list.
Compass
Toggles the compass display on the map.
Compass Scale On-Map
Adjusts the size of the compass icon.
Default Teleport Command
Customizes the command used to teleport to waypoints.
Use Y with Particle When TP
Shows a particle effect at the Y-coordinate when teleporting.
Hide IPs/World Names
Hides server IPs and world names from the server list.
Compass Over Everything
Displays the compass on top of all other map elements.
Compass Shadow Color
Changes the color of the shadow behind the compass.
North Compass Color
Changes the compass color when facing north.
Manage your waypoints by pressing U — create, edit, delete, and configure names, icons, and distances.

Add a new waypoint at any time by pressing B.
Conclusion
Xaero's Minimap is a must-have mod for any Minecraft player who wants to navigate the game world with ease.
With enlarged maps, cave views, mob radars, and a full waypoint system, it is one of the most flexible map mods available.
