
Configuring and managing your server
How to Install Minecraft Client Mods with Forge

This article provides a step-by-step guide on how to install mods in Minecraft using Forge. The process starts by downloading the mod files from CurseForge, a repository of Minecraft mods. Depending on the mod, you may also need to install additional dependency mods.
Next, you will need to install Minecraft Forge, which allows you to run mods in Minecraft. There are two ways to install Forge: either through the Vanilla Minecraft Launcher or the CurseForge Launcher. If you choose the Vanilla Minecraft Launcher, you will need to follow the instructions to install Forge manually. If you opt for the CurseForge Launcher, you can either create a custom profile and install the mods manually, or install the mods automatically through the CurseForge app.
Finally, the article provides some tips for troubleshooting common issues that may arise when installing mods, such as crashes upon startup, mod rejection errors when joining a server, or errors related to missing dependencies.
Introduction
Enhance your Minecraft experience by installing mods with Forge. Adding mods to the game opens up endless possibilities for customization and adventure. Whether you want to explore alone in single-player mode or join a server with friends, you will need to install the mods on your computer. In this comprehensive guide, we will walk you through the installation process and help you avoid common issues.
Step 1: Downloading Mods
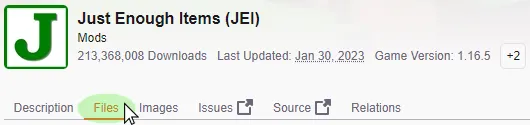
- Visit the CurseForge mods list and browse to the desired mod page.
- Press the "Files" button at the top of the page, then scroll down to "View All."
- Choose the version you wish to use and press the "Download" button to the right.
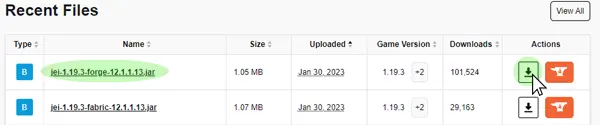
- Save the file in a safe location as you will need it soon.
Step 2: Checking for Dependency Mods
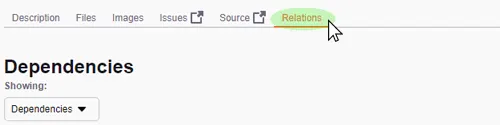
- Some mods may require other mods to function properly. This information can be found in the mod description or under the "Relations" tab at the top of the CurseForge page.
- If a dependency is listed, download the matching version as you did in Step 1.
Step 3: Installing Minecraft Forge
- Navigate to the Minecraft Forge download page.
- Select the version you require from the left-hand menu.
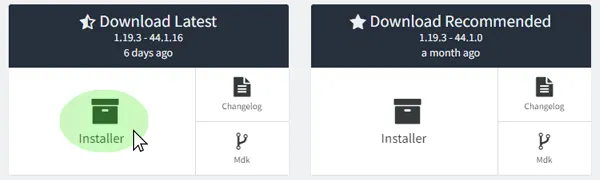
- Choose either "Installer" from the "Latest" or "Recommended" release.
- Save and run the downloaded Forge .jar file.
- Check the information and press "Ok" to install.
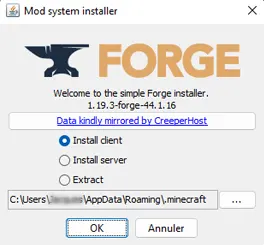
Note: If you cannot find your Forge profile, visit the "Installations" tab in the Minecraft launcher, then ensure the "Modded" box is checked.
Step 4: Adding Mods
- From the Minecraft launcher, go to the "Installations" tab.
- Hover over your Forge installation and press the "Open Folder" icon to the right.
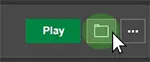
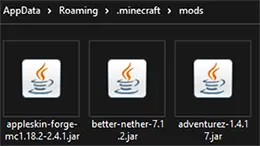
- Locate or create the "mods" folder and enter it.
- Paste the mod .jar file(s) you saved in Step 1 into this location.
- Return to the Minecraft launcher and press "Play."
Alternate 1 : Installing Mods with the CurseForge Launcher
- Download and install the CurseForge launcher from their website.
- Once opened, press the "Create Custom Profile" button at the top.

- Customize the profile name and Minecraft version as desired.
- If you need a specific Forge version, use the dropdown menu.
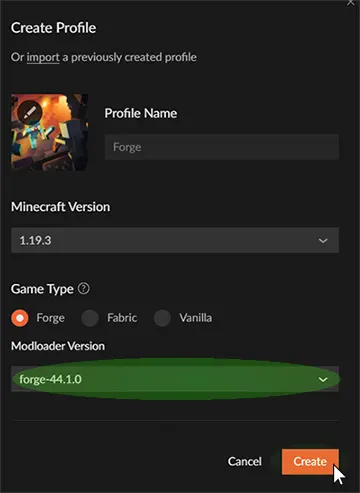
- Press "Create" to install Forge to the new profile.
Alternate 2 : Installing Mods Manually
- Right-click your newly-created Custom Profile in the CurseForge app.
- Press the "Open Folder" button and enter the opened window.
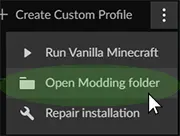
- Locate and enter the "mods" folder, then paste the mod file(s).
- Return to CurseForge and press "Play" on your custom profile.
Note: You can use this method to install mod files on existing modpacks to add more features.
Alternate 3 : Installing Mods Automatically with CurseForge
- Click on your Custom Profile in the CurseForge app.

- Under the "Installed Mods" section, press "Add More Content."
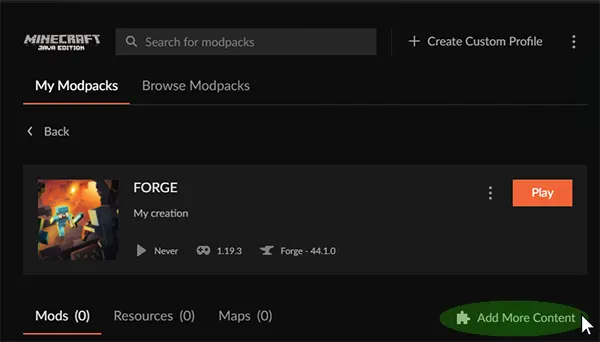
- Browse for the desired mod, then click "Install."
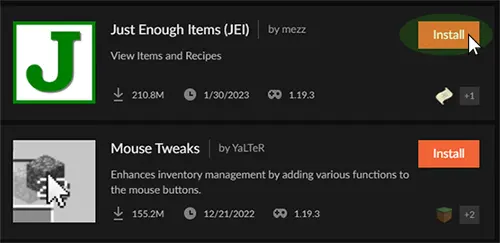
- CurseForge will automatically download the necessary files for the mod.
- Once completed, press "Play" to load up your mod files.
Common Issues:
Crashes upon startup: This can occur when there is an issue with one of the mod files. This can be fixed by ensuring all mods and Forge are running the same game version and that any dependency mods are installed.
Mod rejection error when joining a server: This error occurs when the server is running mods that are not installed on the client or vice-versa. This can be fixed by checking that all installed mods on the server are also installed on the client's game.
"This server has mods that require FML/Forge to be installed on the client" error: This error occurs when attempting to join a server from a vanilla version. This can be fixed by making sure to only launch from a Forge installation.
Incompatible mods: This occurs when two or more mods are trying to modify the same aspect of the game, leading to conflicts and errors. This can be fixed by removing one of the conflicting mods or finding a compatible version.
Incorrect mod installation: This can occur if the mod is not installed in the correct location or if it is not installed using the proper instructions. This can be fixed by following the mod's installation instructions carefully.
To resume :
Here are some tips for installing Forge mods on your Minecraft client:
Check compatibility: Make sure the mods you want to install are compatible with your version of Minecraft and Forge.
Download the mods: Download the mods from a reputable source, such as CurseForge or the mod author's website.
Install Forge: If you haven't already, install Forge on your Minecraft client. This is a necessary step for using any Forge mods.
Copy mod files: Copy the mod files into your Minecraft mods folder, which is located in your Minecraft directory.
Launch Minecraft: Launch Minecraft from the Forge profile to ensure the mod is loaded correctly.
Check for updates: Regularly check for updates for both Minecraft and Forge, as well as for the mods you have installed. Updating these components can resolve any issues or compatibility problems.
Troubleshoot: If you encounter any issues with the mod installation, check the mod's documentation or forums for troubleshooting tips. If all else fails, consider uninstalling and reinstalling the mod.
Get Started with a
Minecraft Server
Looking to create your own minecraft server? It only takes a few minutes.