
Configuring and managing your server
How to set up Dynmap
 The Dynmap plugin is a great way to add features to your Minecraft server that aren't usually possible. Using this plugin, you can generate an online webpage that functions almost identically to a Google map for the Minecraft worlds you create. The Dynmap map also supports a wide variety of plugins, like Towny and Factions. Dynmap is the way to go if you seek a solution to improve the functionality of your server even further.
This tutorial will help you with the installation and configuration of Dynmap on your server.
Don't forget that to install a plugin your server version needs to support plugins, such as Spigot, PaperMC, or Craftbukkit.
If you are using another version, please read this tutorial first, on how to change your Minecraft version.
Dynmap can cause performance issues during the generation, it's important to have at least 4 CPU Cores on your server, otherwise, you may have lags, 6 Cores are greatly recommended. You can add the 6 cores on the renew page of your control panel.
Installing Dynmap
- Go to the official Dynmap page
- Select the version that is compatible with your server, and download it
- Login to your panel control, open the WebFTP and navigate to the plugins folder (if you don't see the folder, you must change your Minecraft version to PaperMC or Spigot, please read this tutorial first, on how to change your Minecraft version)

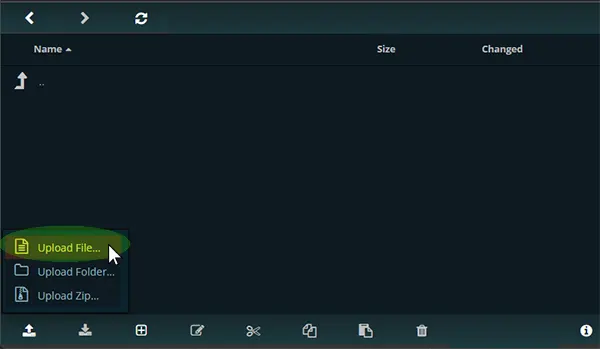
- Drag and drop the dynmap jar file into the plugins folder, or click on upload arrow to upload dynmap
Alternatively, you can also connect to your server with FTP access in using Filezilla or Winscp - Restart your server
Configuring Dynmap
1. After the installation, click on the Start or Restart icon to start the server, this will create a Dynmap folder.
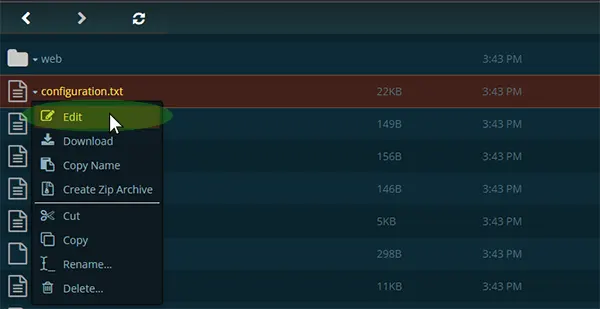
2. Open the WebFTP and go to the directory: Plugins/dynmap/configuration.txt
3. Right-Click the file "configuration.txt", and select edit.
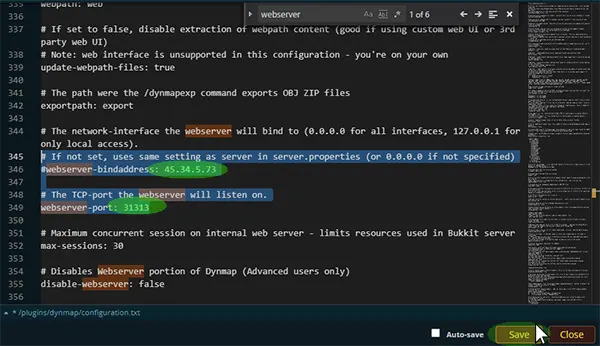
4. Use Search function by pressing CTRL- F keys to locate #webserver-bindaddress (near line 346)
Enter your server IP address without the port, your server IP address is displayed at the top of your panel, next to your server name)
Locate near line 349 #webserver-port : 31313
Enter a port between 31000 and 32500. (Don't use the same port on all your plugins.)
If the port is not available, you will get an error on startup, so just change the port until it works.
Locate deftemplatesuffix and set it to vlowres or lowres, or the generation will kill your server, by using too many CPU cores.
Locate image-format and set it to jpg.
5. Press save
6. Restart the server to apply the modifications.
Initiate Map Generation
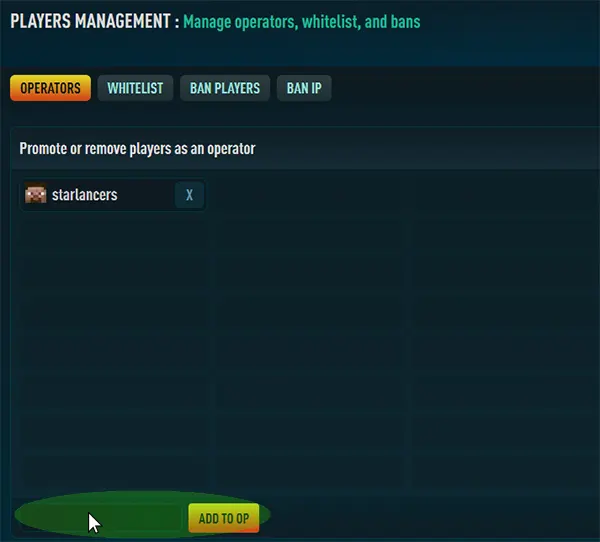
You need to be operator to run dynmap commands.
1. Once the server has fully started, go to your Console panel to add your player nickname operator, write this command: op (your nickname)

or alternatively navigate to the players page on the panel
2. Launch your Minecraft client and connect to your server, to write this command to load your map rendering: /dynmap fullrender
You can also launch this command from the console.

It's take around 10 or 20 minutes for the first generation of your map.

3. Once the generation is done, open your web browser and write your IP with the port that you've chosen before: 45.34.5.73:31313 (for our server, you will have to enter yours)
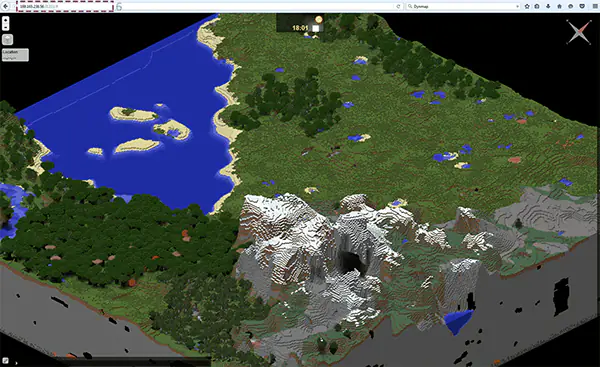
You should now see your map
Adding a ressource pack on dynmap
If you want to go deeper, for advanced users, you can add a resource pack to customize the map render to feet with your map.
- Download a ressource pack from curse compatible with your server version.
- Stop your server.
- Open the WebFTP then navigate to the plugins / Dynmap / texturepacks folder.
- Drag and drop your ressource pack .zip file inside the texturepack folder.
- Once it's fully uploaded, navigate back to the main Dynmap folder.
- Locate the file named shaders.txt, right-client and select edit.
- Replace the contents of this file by the following:
shaders:
- class: org.dynmap.hdmap.TexturePackHDShader
name: stdtexture
texturepack: (Full name of texturepack here) - Add the name of your texturepack file with his extension after texturepack:
by example, texturepack: Excalibur_V1.18.1.zip - Click on save
- Start your server and launch a full render with the command /dynmap fullrender
Get Started with a
Minecraft Server
Looking to create your own minecraft server? It only takes a few minutes.